How to Use Amazon SQS With Spring Boot
-
 Chinthaka Dinadasa
 - 29 Nov, 2022
Amazon SQS (Simple Queue Service) allows us to configure software components to send, receive and store messages. Here in this tutorial we will look into a spring boot solution which configured with Amazon SQS with practical scenarios.
Requirement
Personal budget application has a requirement on generating invoices on expenses when an user create a expense entry.
Here application should not wait until processing invoice generation when user save expenses and user should get generated invoice emailed after completion.
Brief Solution
We can design our API to accept expense creation and push those data to a AWS SQS Queue. Then from a processor service the same published message can be pulled and start processing.
Then we can proceed with sending email for the user with generated invoice on completion of the expense processing and invoice generation.
Creating Queue On AWS SQS
In this tutorial, we need a single message queue where we are going to store the messages. There are 2 ways in creating this queue,
- Using AWS dashboard
- Using AWS SDK
- You can choose any preferred way to achieve this target, and here we are using AWS SDK to create the queue programmatically.
Development
This sample project will have 2 spring boot components which will act as publisher and consumer.
Tech stack that we are going to use,
- Spring Boot 3.0.0
- Java 17
- Gradle
- Lombok
- AWS Java SDK SQS
You can create applications using spring initializr or follow our tutorial on How to Create a Spring Boot Project.
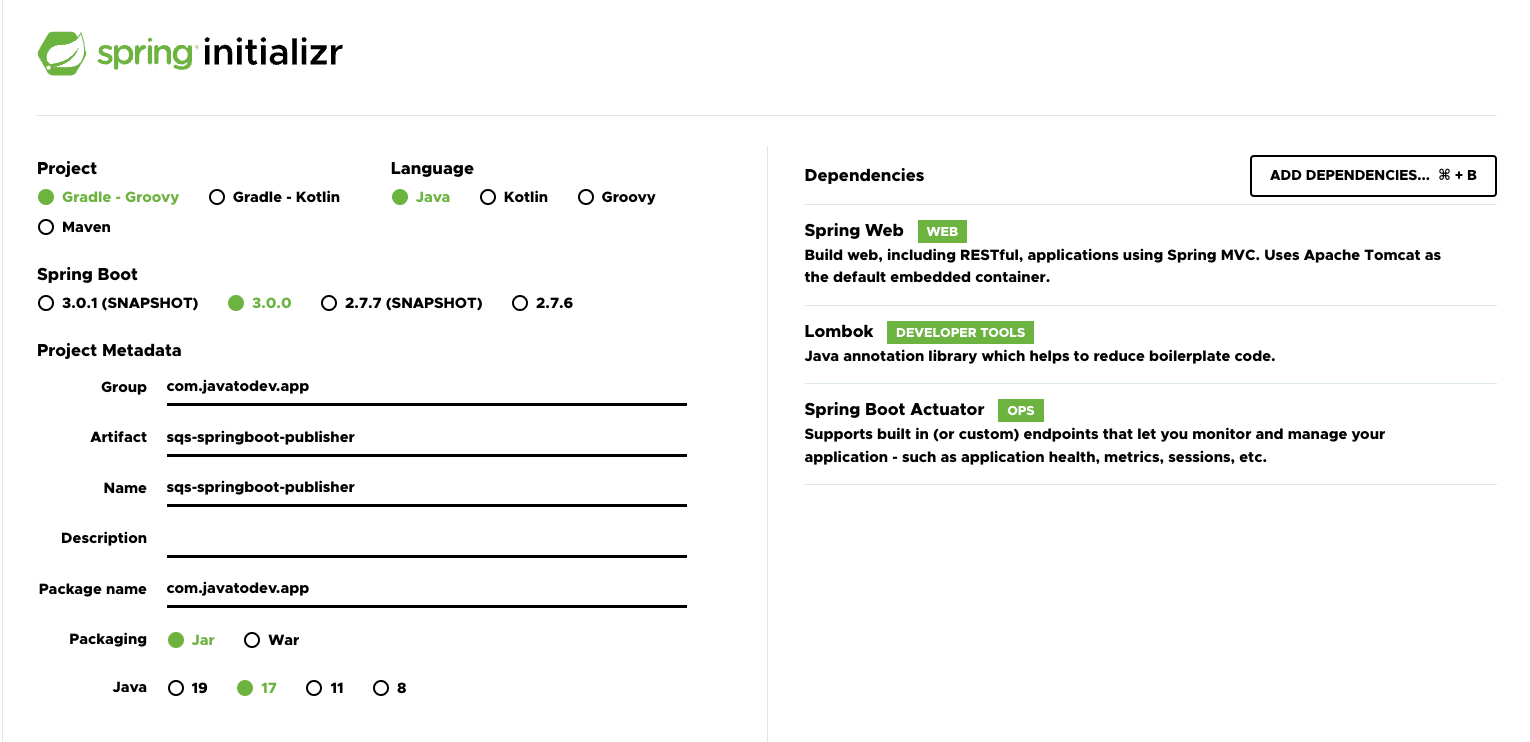
Creating spring boot publisher application using spring initializr
Add the following dependency to the application build.gradle, this will add necessary dependencies to access amazon SQS through the SDK.
implementation 'com.amazonaws:aws-java-sdk-sqs:1.12.349'
Project Prerequisites
Here we need to have an AWS access key id and secret which has AWS SQS permission granted, to manage SQS programmatically.
Here I’ve created an user from AWS IAM console with programatical access and AmazonSQSFullAccess permission.
Then Add the following to the application properties in both publisher and consumer applications.
app.config.aws.access_key_id=<YOUR KEY ID>app.config.aws.secret_key_id=<YOUR SECRET>
Also we are using a name to uniquely identify the message queue and it will be loaded from application properties. Feel free to directly use it as a string as well.
Add this to application.properties in both publisher and consumer applications.
app.config.message.queue.topic=JAVATODEV_SQS_QUEUE_EXPENSES
Message Publisher Spring Boot Application Development
First, We should have to build the communication from our application to AWS SQS. To do that we can use Amazon SQS interface which allows us to access amazon SQS.
Additionally this can be created as a bean to the application since the we have to use it everywhere when we need to access AWS SQS as follows,
package com.javatodev.app.configuration;

import com.amazonaws.auth.AWSStaticCredentialsProvider;
import com.amazonaws.auth.BasicAWSCredentials;
import com.amazonaws.services.sqs.AmazonSQS;
import com.amazonaws.services.sqs.AmazonSQSClientBuilder;
import org.springframework.beans.factory.annotation.Value;
import org.springframework.context.annotation.Bean;
import org.springframework.context.annotation.Configuration;

@Configurationpublic
class SQSClientConfiguration {
    @Value("${app.config.aws.access_key_id}")
    private String awsAccessKeyId;
    @Value("${app.config.aws.secret_key_id}")
    private String awsSecretKeyId;

    @Bean
    public AmazonSQS amazonSQSClient() {
        BasicAWSCredentials awsCredentials = new BasicAWSCredentials(awsAccessKeyId, awsSecretKeyId);
        return AmazonSQSClientBuilder.standard().withCredentials(new AWSStaticCredentialsProvider(awsCredentials))
                .withRegion("us-west-1").build();
    }
}
Then create the MessageQueueService class where we are mainly doing everything related to message queue handling in publisher side.
package com.javatodev.app.service;

import com.amazonaws.services.sqs.AmazonSQS;
import com.amazonaws.services.sqs.model.CreateQueueRequest;
import com.amazonaws.services.sqs.model.CreateQueueResult;
import com.amazonaws.services.sqs.model.QueueNameExistsException;
import org.springframework.beans.factory.annotation.Value;
import org.springframework.stereotype.Service;
import lombok.RequiredArgsConstructor;
import lombok.extern.slf4j.Slf4j;

@Slf4j
@Service
@RequiredArgsConstructorpublic
class MessageQueueService {
    @Value("${app.config.message.queue.topic}")
    private String messageQueueTopic;
    private final AmazonSQS amazonSQSClient;

    public void createMessageQueue() {
        log.info("Creating message queue on AWS SQS");
        CreateQueueRequest request = new CreateQueueRequest();
        request.setQueueName(messageQueueTopic);
        try {
            CreateQueueResult queue = amazonSQSClient.createQueue(request);
            log.info("Create Queue Response {}", queue.getQueueUrl());
        } catch (QueueNameExistsException e) {
            log.error("Queue Name Exists {}", e.getErrorMessage());
        }
    }
}
Let’s create another Configuration class where we use @PostConstruct annotation to create this message queue on application startup.
package com.javatodev.app.configuration;

import com.javatodev.app.service.MessageQueueService;
import org.springframework.context.annotation.Configuration;
import jakarta.annotation.PostConstruct;
import lombok.RequiredArgsConstructor;

@Configuration
@RequiredArgsConstructorpublic
class AppConfiguration {
    private final MessageQueueService messageQueueService;

    @PostConstruct
    public void initializeMessageQueue() {
        messageQueueService.createMessageQueue();
    }
}
Then create an endpoint where we can submit messages using AWS SDK client we have already configured.
Add following to the MessageQueueService we created earlier.
public void publishExpense(CreateExpenseDto createExpenseDto) {
    try {
        GetQueueUrlResult queueUrl = amazonSQSClient.getQueueUrl(messageQueueTopic);
        log.info("Reading SQS Queue done: URL {}", queueUrl.getQueueUrl());
        amazonSQSClient.sendMessage(queueUrl.getQueueUrl(), createExpenseDto.getType() + ":" + createExpenseDto.getAmount());
    } catch (QueueDoesNotExistException | InvalidMessageContentsException e) {
         log.error("Queue does not exist {}", e.getMessage());
        }
}
Message Consumer Spring Boot Application Development
We have already discussed and developed the first part on building communication with SQS client, Just add SQSClientConfiguration class and related app configurations to the consumer application as well.
Here in this sample project we are using spring scheduler to pull things from the message queue in AWS.
First enable scheduling in the consumer application using @EnableScheduling annotation.
package com.javatodev.app;

import org.springframework.boot.SpringApplication;
import org.springframework.boot.autoconfigure.SpringBootApplication;
import org.springframework.scheduling.annotation.EnableScheduling;

@EnableScheduling
@SpringBootApplicationpublic
class SqsSpringbootConsumerApplication {
    public static void main(String[] args) {
        SpringApplication.run(SqsSpringbootConsumerApplication.class, args);
    }
}
Then create the MessageQueueService which involves in pulling messages from the message queue and process the request.
Here we are going to process message one by one, hence only processing first message from the messages list.
package com.javatodev.app.service;

import com.amazonaws.services.sqs.AmazonSQS;
import com.amazonaws.services.sqs.model.Message;
import com.amazonaws.services.sqs.model.QueueDoesNotExistException;
import com.amazonaws.services.sqs.model.ReceiveMessageResult;
import org.springframework.beans.factory.annotation.Value;
import org.springframework.scheduling.annotation.Scheduled;
import org.springframework.stereotype.Service;
import lombok.RequiredArgsConstructor;
import lombok.extern.slf4j.Slf4j;

@Slf4j
@Service
@RequiredArgsConstructor
public class MessageQueueService {
    @Value("${app.config.message.queue.topic}")
    private String messageQueueTopic;
    private final AmazonSQS amazonSQSClient;

    @Scheduled(fixedDelay = 5000) // executes on every 5 second gap.
    public void receiveMessages() {
        try {
            String queueUrl = amazonSQSClient.getQueueUrl(messageQueueTopic).getQueueUrl();
            log.info("Reading SQS Queue done: URL {}", queueUrl);
            ReceiveMessageResult receiveMessageResult = amazonSQSClient.receiveMessage(queueUrl);
            if (!receiveMessageResult.getMessages().isEmpty()) {
                Message message = receiveMessageResult.getMessages().get(0);
                log.info("Incoming Message From SQS {}", message.getMessageId());
                log.info("Message Body {}", message.getBody());
                processInvoice(message.getBody());
                amazonSQSClient.deleteMessage(queueUrl, message.getReceiptHandle());
            }
        } catch (QueueDoesNotExistException e) {
            log.error("Queue does not exist {}", e.getMessage());
        }
    }

    private void processInvoice(String body) {
        log.info("Processing invoice generation and sending invoice emails from here..");
    }
}
-
AWS ECS temporarily hide a message when an consumer pulled it. hence same message will not be delivered again and again for given period of time.
-
We should handle message after we pulled it from AWS SQS with acknowledging it, and sending delete message request with the message ID. Otherwise same message will be available to pull again which will cause message duplications.
Dead Letter Queue
Dead letter queue allows us to handle any unprocessed messages which coming from publishers. Additionally this allows us to debug our messaging queue setup in order to identify why some messages are not getting processed.
Conclusions and Further Reading
In this article we have discussed how we can setup Amazon SQS queue with Spring boot application on a practical scenario.
Refer official documentation on Amazon SQS from here.
The implementation of all these examples and code snippets can be found in our Github repository.
Happy coding.