Microservices - Service Registration and Discovery With Spring Cloud Netflix Eureka
-
 Chinthaka Dinadasa
 - 10 May, 2021
Hi guys, So as the beginning of our newest article series on Building Microservices with Spring Boot, Here I’m going to explain about Service Registry and Service Discovery using Spring Cloud Netflix Eureka, in detail plus practically how we can implement service registry server to work with multiple service clients.
First I’m going to explain service registry and service discovery a bit, If you already know about it go setup stage directly.
What Is The Service Registry?
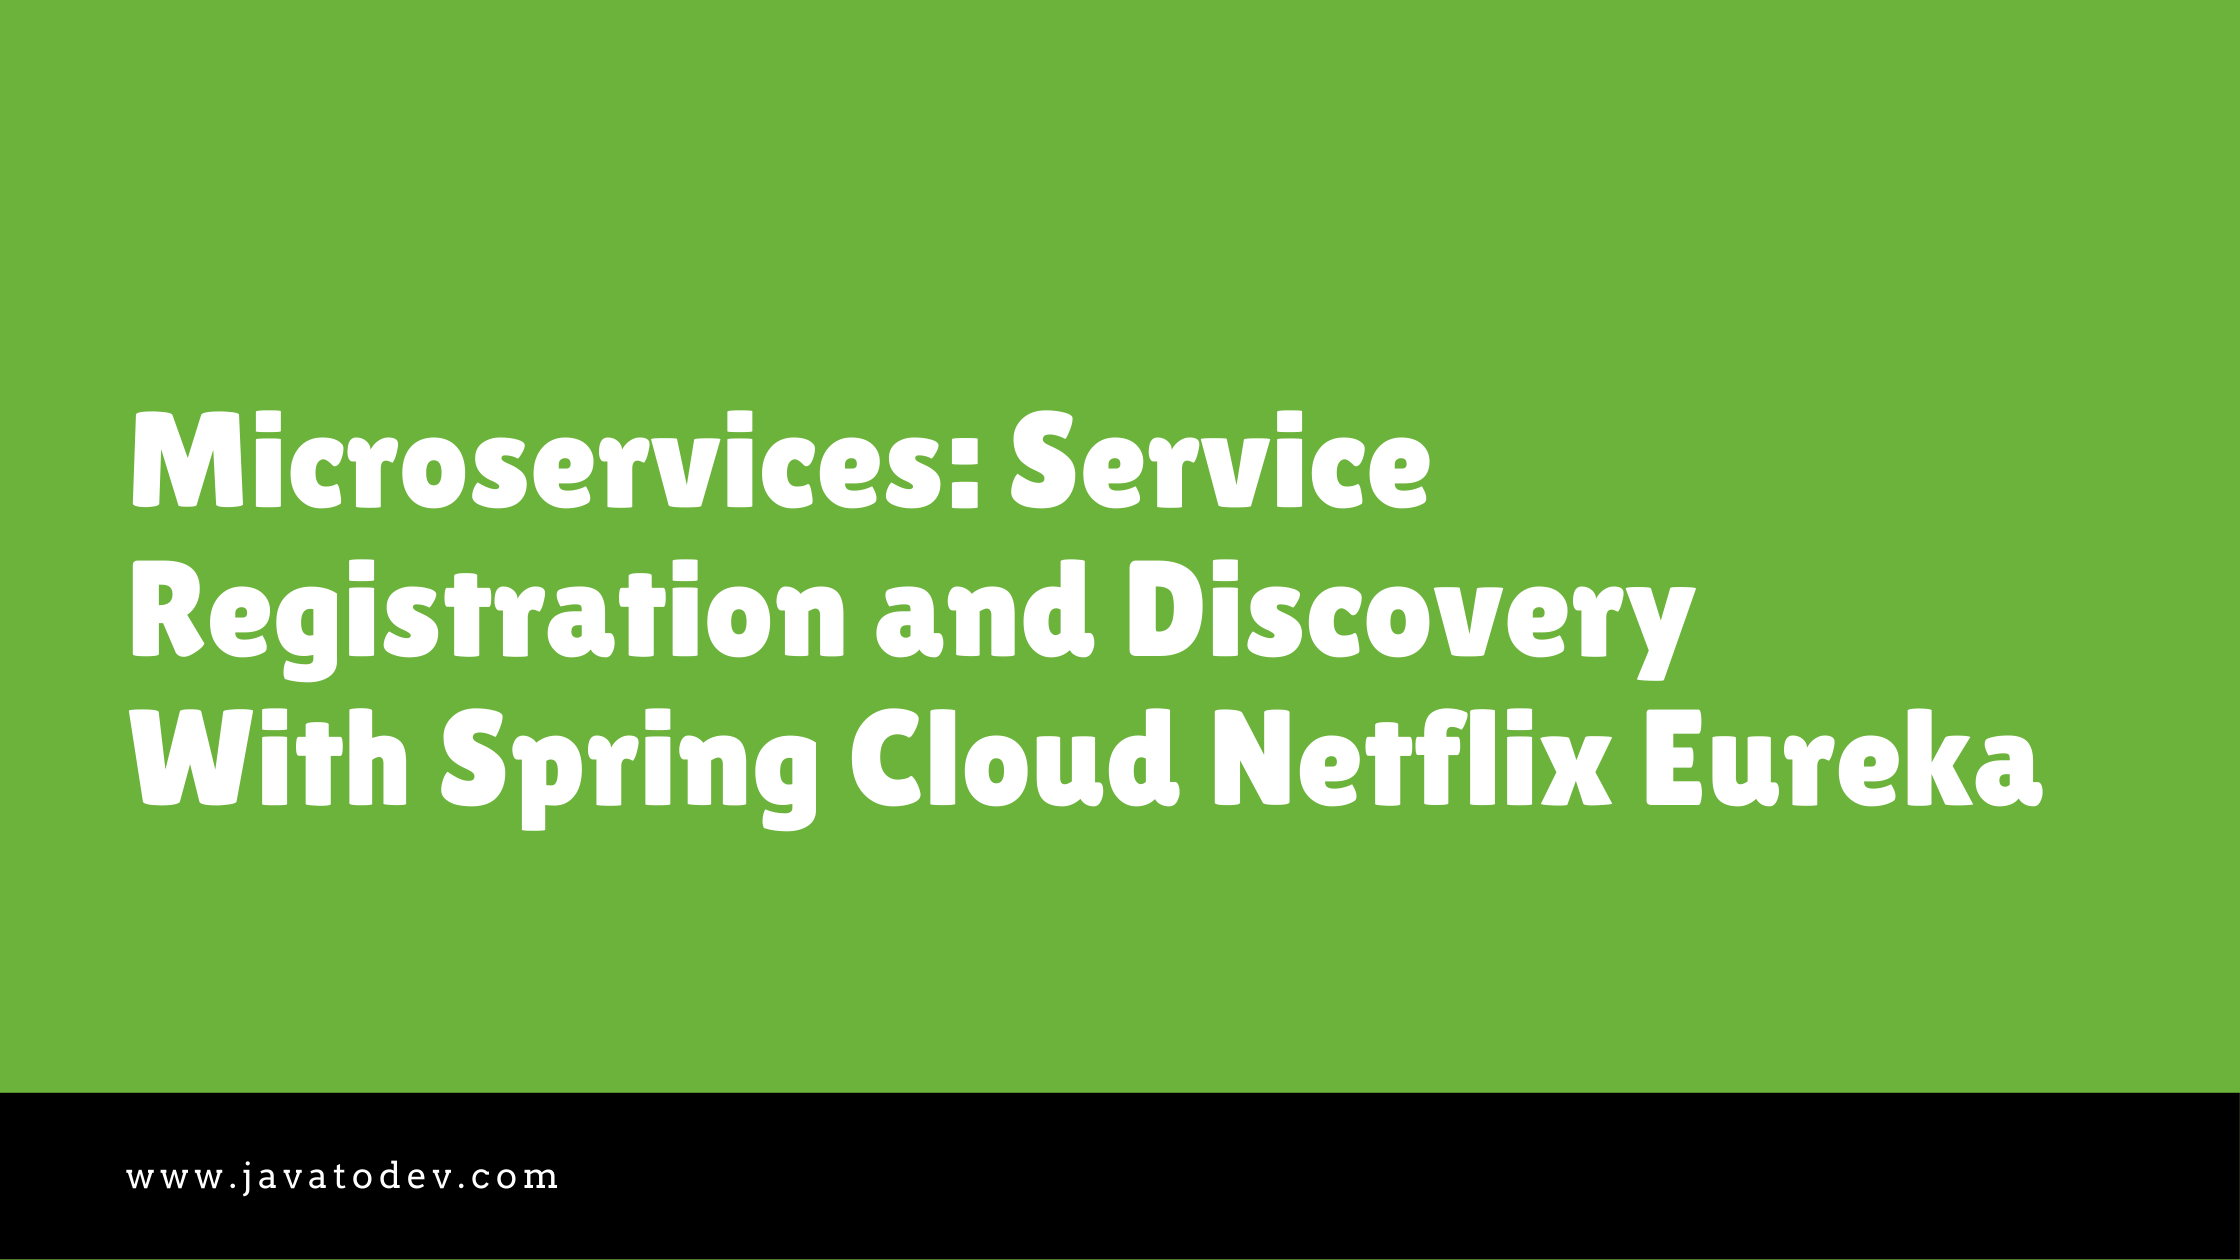
The service registry is simply an application that keeps the track of services inside the microservice architecture, and It should be highly available and up to date. Normally in microservices, any service could go up and down, hence all the details regarding the status of those microservices should be communicated with the registry. That’s what basically happens with registration.
In addition to that, there are two types of registrations in microservices,
-
Self-registration. – This service interacts with the registry by itself when going up and down.
-
Third-party registration. – This is the most used way in the service registry, and here there is a process or a service that manages registration. Here is the place where Netflix Eureka comes on the stage.
Service Registry in Microservices Architecture
What Is Service Discovery?
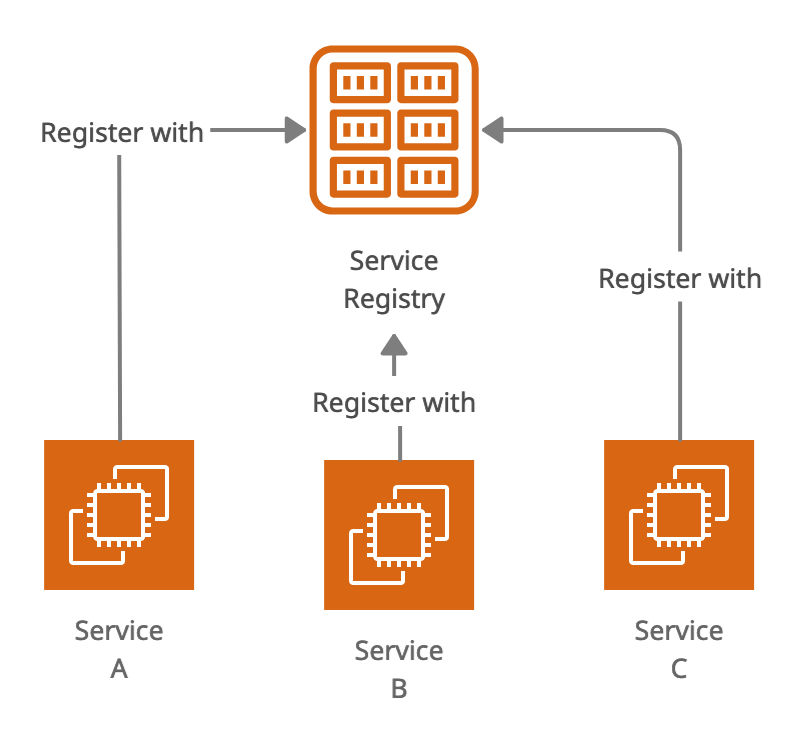
As you can imagine, discovery is the counterpart to registration from the point of view of clients. When a client wants to access a service, it must find out where the service is located (and other relevant information to perform the request).
There are two types of service discovery as well.
-
Client-side service discovery – clients query a discovery service before performing the actual requests. As happens with self-registration, this requires clients to deal with additional concerns other than their main objective
-
Server-side service discovery. – This is the most used discovery pattern in microservices and API gateway is using this to identify from service registry information and route the requests to the correct endpoint that coming into the API gateway.
How API Gateway use service discovery to route client requests to correct API endpoint using service registry
Setup Service Registry With Spring Cloud Netflix Eureka Server
Let’s start building our microservices project by setting up the service registry first,
here I’m using Eureka Server (org.springframework.cloud:spring-cloud-starter-netflix-eureka-server) with a common spring boot application and setting up the service registry base on that library.
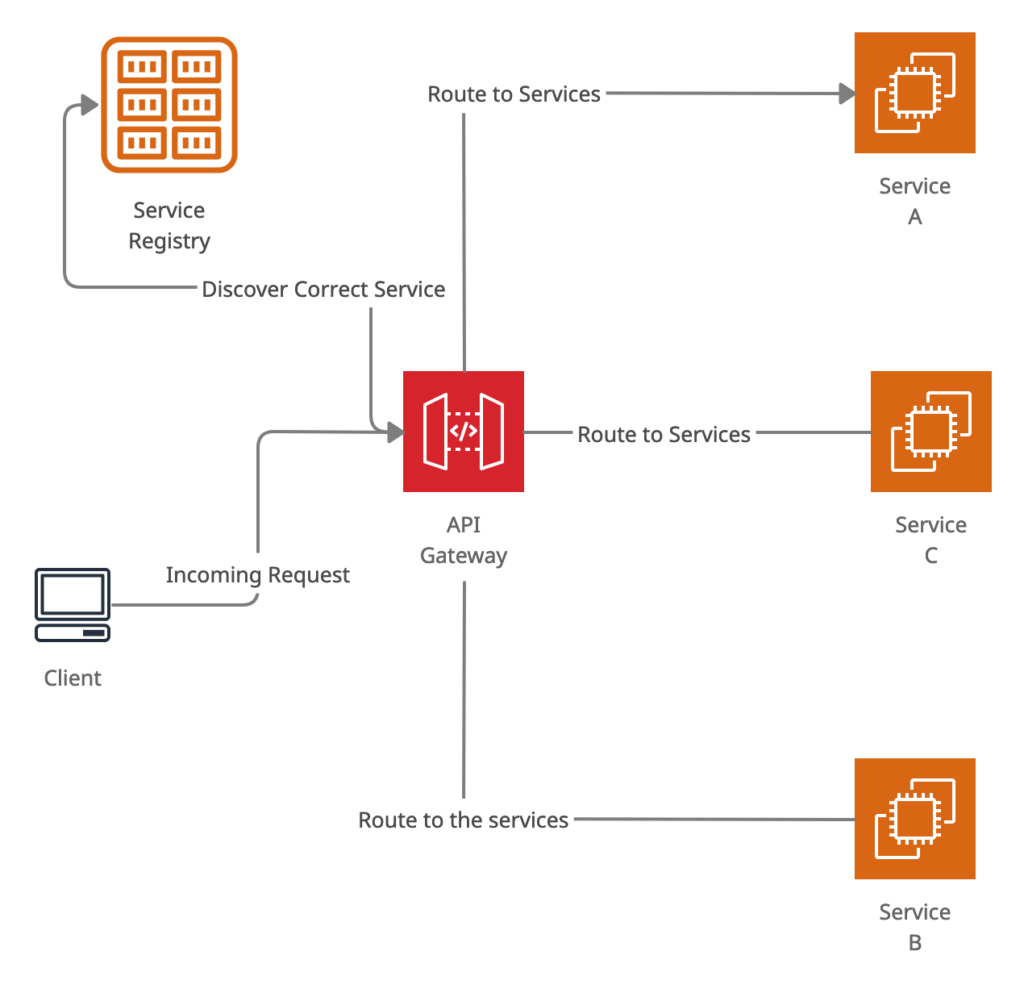
First, go to spring initializer and select the following dependencies to build your service registry project.
- Spring web.
- Eureka Server.
- Spring Boot Actuator.
If you are really new to Spring Boot, Please follow our article on How to Create a Spring Boot Project.
Adding base dependencies and create service registry project with spring initializr
Here I’m using Java 8, But if you are comfortable with latest version feel free to choose the version that you need.
Then open your project with the IDE that you are using and here I’m using IntelliJ IDEA from JetBrains and I’d like to recommend it if you are into java based web developments.
add @EnableEurekaServer to the main class of your service registry application like below,
package com.javatodev.finance;

import org.springframework.boot.SpringApplication;
import org.springframework.boot.autoconfigure.SpringBootApplication;
import org.springframework.cloud.netflix.eureka.server.EnableEurekaServer;

@EnableEurekaServer
@SpringBootApplication
public class InternetBankingServiceRegistryApplication {

    public static void main(String[] args) {
        SpringApplication.run(InternetBankingServiceRegistryApplication.class, args);
    }

}
After that, add the following configurations into the application properties or the yml file, Spring Initializr creates a application.properties as default, I just removed it and created application.yml on src/main/resources folder.
server:
  port: 8081

eureka:
  client:
    service-url:
      defaultZone: http://localhost:8081/eureka
    fetch-registry: false
    register-with-eureka: false
Here I’m setting custom port for this application without using the 8080 default port, In addition to that I’m setting custom URL for as the default zone otherwise, Eureka will use http://localhost:8761 as default zone.
Also I’m adding register-with-eureka: false, otherwise eureka will try to register this server as a client to itself by default config, This will be blocked with this property.
Then fetch-registry: false this is another config that coming as default true, Hence we needs to mark it as false when we are using this with eureka server, Otherwise it will try to fetch details about all the registered services from itself.
Both scenarios will make issues while starting the eureka server. That’s why we block both scenarios using this configuration.
All done Let’s start our fresh Eureka Service Registry with Spring boot project.
Just go to the project root and start application using following command.
$ ./gradlew bootRun
Then access the following URL using your browser and check whether the Eureka service registry is up and running.
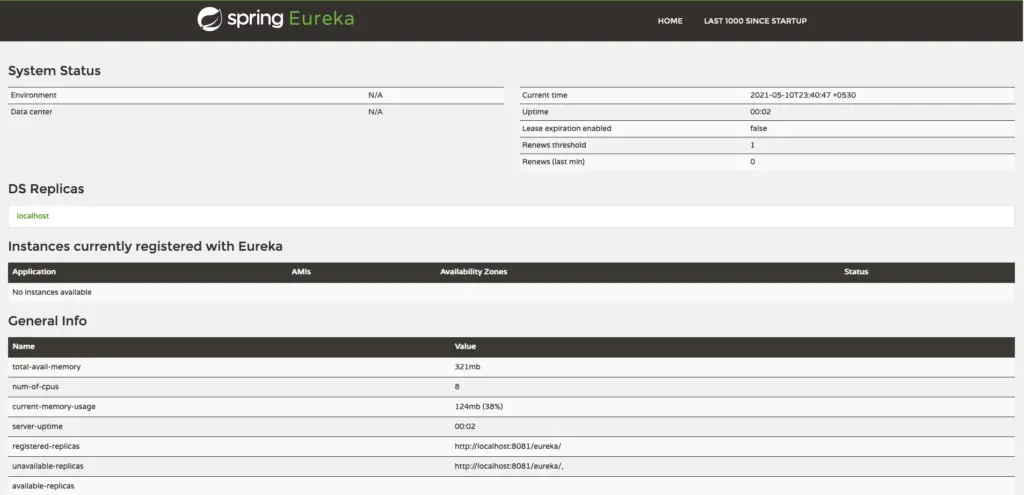
Eureka Service Registry Dashboard
Now we have completed setting up our service registry, and let’s see how we can create a service client and get it registered with our service registry to gain service registration and discovery.
Registering Service Clients To Eureka Service Registry
Here I’m going to register one client with this service registry, and for that let’s create another spring boot project, and let’s name it as internet-banking-api-gateway, Because we can use it as the API gateway for this microservices project in future developments.
So just go to the spring initializr and create another project with following dependencies,
- Spring web.
- Eureka Discovery Client.
- Spring Boot Actuator.
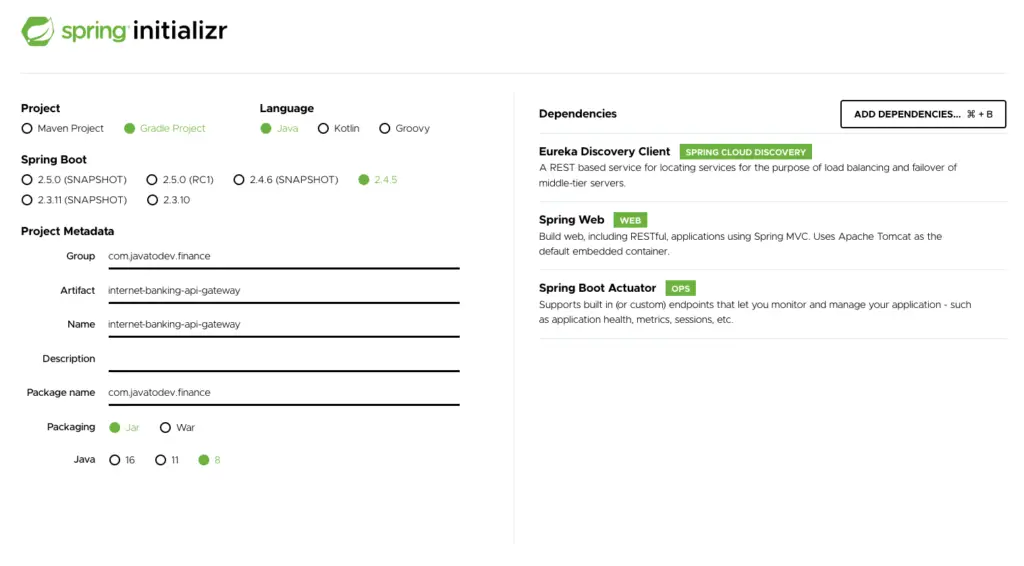
Spring Initializr Creating API Gateway Project
Then add @EnableEurekaClient to the main class in that project like below,
package com.javatodev.finance;

import org.springframework.boot.SpringApplication;
import org.springframework.boot.autoconfigure.SpringBootApplication;
import org.springframework.cloud.netflix.eureka.EnableEurekaClient;

@EnableEurekaClient
@SpringBootApplication
public class InternetBankingApiGatewayApplication {

    public static void main(String[] args) {
        SpringApplication.run(InternetBankingApiGatewayApplication.class, args);
    }

}
and then setup the configurations to register with our service registry which started previously,
spring:
  application:
    name: internet-banking-api-gateway

server:
  port: 8082

eureka:
  client:
    service-url:
      defaultZone: http://localhost:8081/eureka
All done, now our first service client which is the API gateway to the microservices architecture is ready to start and register as a client,
Just start the internet-banking-api-gateway and reload the Eureka service registry URL, If you have done everything correctly then it should showing INTERNET-BANKING-API-GATEWAY under the Instances currently registered with Eureka.
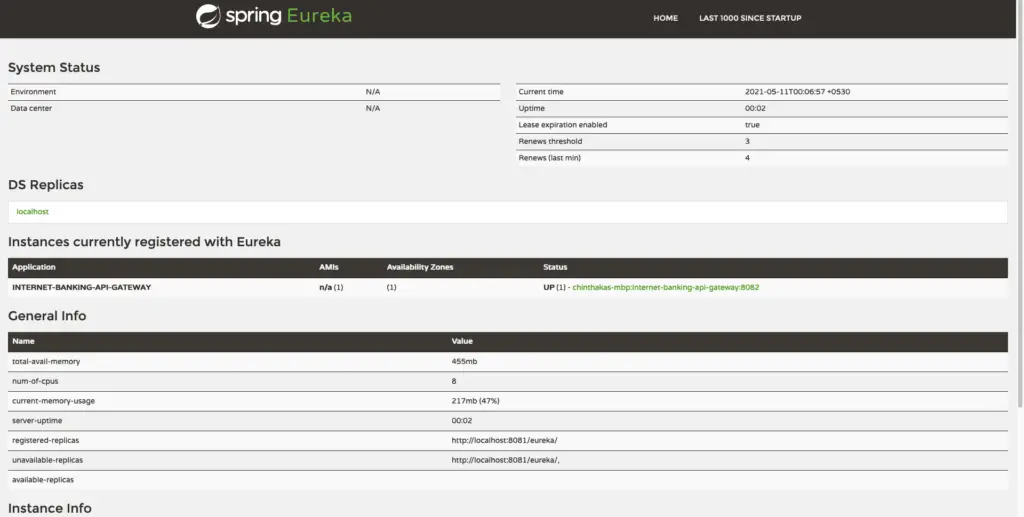
API Gateway Registered with Eureka Server.
Now we have a fully functioning Service Registry and we have successfully registered our API gateway with that service registry as well. So Let’s see how we can build the fully functioning API gateway using Spring Cloud Gateway and Configure few routes into our other API services inside this Microservices architecture in our next article in this series.
Conclusion
Thanks for reading our latest article on Service Registration and Discovery With Spring Cloud Netflix Eureka with practical usage.
If you are looking for spring boot based practical application development tutorials, just check our article series.
You can get source code for this tutorial from our GitHub repository.