Multiple Datasources With Spring Boot Data JPA
-
 Chinthaka Dinadasa
 - 09 Feb, 2021
Hello readers, In this article I’m going to explain how we can use multiple data sources in Spring Boot application which uses Spring Data JPA with practical usage.
Technologies going to use,
- Java 1.8
- Spring Boot: 2.3.4.RELEASE
- Spring Data JPA
- PostgreSQL
- Lombok
- Gradle
- Intellij Idea for IDE
Where Can We Use This Solution?
Let’s think your spring boot application should use two databases in the same instance, to save different data sets. In that case, we can give spring data JPA a chance to identify multiple data sources, and data JPA will use those data source connections to access those different databases.
Here I’ll explain this tutorial with the following scenario where users, accounts, and credit cards should be saved in different databases.
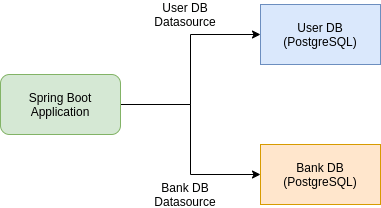
Spring Boot Multiple Datasources Diagram
Solution In Brief
Here we will create two data source configurations for User DB and Bank DB. Additionally, we will introduce different database connection parameters in application properties and use those in mentioned data source configurations and we should let spring boot identify repository layer and entity layer for each data source config.
Create Spring Boot Application
Here I’m using spring initializr to generate a spring boot project with all the dependencies I need for this tutorial. If you are really new to Spring Boot, Please follow our article on How to Create a Spring Boot Project.
Here I’ve selected following dependencies to create spring boot project using spring initilizr,
- Spring Web – contains common web-specific utilities for both Servlet and Portlet environments.
- Lombok – The coolest plugin to spicing up your java. Never write another getter or equals method again, with one annotation your class has a fully-featured builder, Automate your logging variables, and much more.
- Spring Data JPA – JPA with Spring Data
- PostgreSQL – PostgreSQL driver for spring boot.
If you need to learn how we can use Lombok in spring boot follow our article Guide to use Lombok In Spring Boot.
Defining User Database Models and Repositories
Here we will create the model classes and repositories for user database speific tables.
first, create a package in root level (com.javatodev.api in my example) named as model and create a UserEntity.java and paste following content to that file,
package com.javatodev.api.model.user;

import lombok.*;

import javax.persistence.*;

@Entity
@Builder
@Getter
@Setter
@NoArgsConstructor
@AllArgsConstructor
@Table(name = "bank_user")
public class UserEntity {
    @Id
    @GeneratedValue(strategy = GenerationType.IDENTITY)
    private Long id;
    private String username;
}
Then create another package named as com.javatodev.api.repository.user, and add following UserRepository.java
package com.javatodev.api.repository.user;

import com.javatodev.api.model.user.UserEntity;
import org.springframework.data.jpa.repository.JpaRepository;

public interface UserRepository extends JpaRepository<UserEntity, Long> {
}
Defining Bank Database Models and Repositories
Now we are ready with user DB specific changes. Let’s focus on Bank specific models and repositories.
Here do the same what we did above in creating user-specific models and repositories. Additionally keep in mind to create those inside a package called bank since we need to separate Bank specific models, repositories with User specific ones.
create AccountEntity.java in com.javatodev.api.model.bank.account and copy following content,
package com.javatodev.api.model.bank.account;

import lombok.AllArgsConstructor;
import lombok.Builder;
import lombok.Data;
import lombok.NoArgsConstructor;

import javax.persistence.*;

@Entity
@Builder
@Data
@NoArgsConstructor
@AllArgsConstructor
@Table(name = "bank_account")
public class AccountEntity {
    @Id
    @GeneratedValue(strategy = GenerationType.IDENTITY)
    private Long id;
    private String number;
}
Then create CreditCardEntity.java in com.javatodev.api.model.bank.card and add following content to it.
package com.javatodev.api.model.bank.card;

import lombok.*;

import javax.persistence.*;

@Entity
@Builder
@Data
@NoArgsConstructor
@AllArgsConstructor
@Table(name = "credit_card")
public class CreditCardEntity {
    @Id
    @GeneratedValue(strategy = GenerationType.IDENTITY)
    private Long id;
    private String type;
    private String number;
}
Then finally create the repository classes for both Account and Credit Card entities as below,
package com.javatodev.api.repository.bank;

import com.javatodev.api.model.bank.account.AccountEntity;
import org.springframework.data.jpa.repository.JpaRepository;

public interface AccountRepository extends JpaRepository<AccountEntity, Long> {
}
package com.javatodev.api.repository.bank;

import com.javatodev.api.model.bank.card.CreditCardEntity;
import org.springframework.data.jpa.repository.JpaRepository;

public interface CreditCardRepository extends JpaRepository<CreditCardEntity, Long> {
}
All done now we have our JPA level configurations set up that we should have in order to access databases.
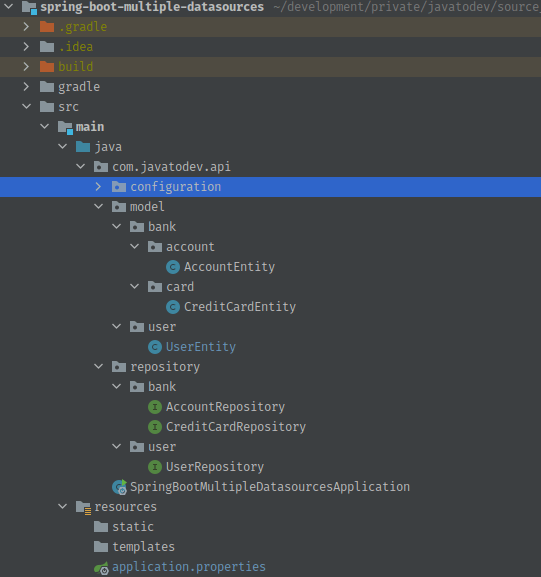
Database Access Entities and Repositories for Spring Boot Project
Configuring Multiple Datasources In Spring Boot Application
Now we should write custom datasource configuration with introducing custom datasource connection properties.
first copy following into the application.properties and here we are setting datasource connection properties for each database.
#DATASOURCE FOR STORE USER SPECIFIC DATA
spring.datasource.user.url=jdbc:postgresql://localhost:5432/java_to_dev_main_db?createDatabaseIfNotExist=true
spring.datasource.user.username=postgres
spring.datasource.user.password=password
spring.datasource.user.driver-class-name=org.postgresql.Driver

#DATASOURCE FOR STORE BANK SPECIFIC DATA
spring.datasource.bank.url=jdbc:postgresql://localhost:5432/java_to_dev_secondary_db?createDatabaseIfNotExist=true
spring.datasource.bank.username=postgres
spring.datasource.bank.password=password
spring.datasource.bank.driver-class-name=org.postgresql.Driver

spring.jpa.hibernate.ddl-auto=update
spring.jpa.generate-ddl=true
spring.jpa.show-sql=true
As you see here we not setting default JPA database connection URL, we are setting additional identifiers as bank and user while setting database connection properties inside this property file.
Then create configuration package in com.javatodev.api.configuration, and create BankDataSourceConfiguration.java inside that package and copy following content to it.
Then introduce @EnableJpaRepositories annotation to introduce package where this datasource should get repositories to access database. Here it is com.javatodev.api.repository.bank. Then in addition to that, we should introduce entity manage reference and transaction manager reference, Just add it as below for the moment and will discuss it below.
@EnableJpaRepositories(basePackages = "com.javatodev.api.repository.bank",
        entityManagerFactoryRef = "bankEntityManagerFactory",
        transactionManagerRef= "bankTransactionManager")
public class BankDataSourceConfiguration {
Then add following @Bean definition into the same configuration file, Here it will capture url, username, password and driver-class-name which we defined in application properties file under bank.
@Bean
@ConfigurationProperties("spring.datasource.bank")
    public DataSourceProperties cardDataSourceProperties() {
        return new DataSourceProperties();
    }
Then create the datasouce using DatasourceProperties method which we have written earlier as below,
@Bean
@ConfigurationProperties("spring.datasource.bank.configuration")
    public DataSource cardDataSource() {
        return cardDataSourceProperties().initializeDataSourceBuilder()
                .type(HikariDataSource.class).build();
    }
Finally, create EntityManagerFactory and TransactionManagerFactory as below, Here we should show where this EntityManager should find Entity classes inside this application. Here It is com.javatodev.api.model.bank.
@Bean(name = "bankEntityManagerFactory")
    public LocalContainerEntityManagerFactoryBean bankEntityManagerFactory(
            EntityManagerFactoryBuilder builder) {
        return builder
                .dataSource(cardDataSource())
                .packages("com.javatodev.api.model.bank")
                .build();
    }

    @Bean
    public PlatformTransactionManager bankTransactionManager(
            final @Qualifier("bankEntityManagerFactory") LocalContainerEntityManagerFactoryBean bankEntityManagerFactory) {
        return new JpaTransactionManager(bankEntityManagerFactory.getObject());
    }
All done now our whole configuration should look like below,
package com.javatodev.api.configuration;

import com.zaxxer.hikari.HikariDataSource;
import org.springframework.beans.factory.annotation.Qualifier;
import org.springframework.boot.autoconfigure.jdbc.DataSourceProperties;
import org.springframework.boot.context.properties.ConfigurationProperties;
import org.springframework.boot.orm.jpa.EntityManagerFactoryBuilder;
import org.springframework.context.annotation.Bean;
import org.springframework.context.annotation.Configuration;
import org.springframework.data.jpa.repository.config.EnableJpaRepositories;
import org.springframework.orm.jpa.JpaTransactionManager;
import org.springframework.orm.jpa.LocalContainerEntityManagerFactoryBean;
import org.springframework.transaction.PlatformTransactionManager;

import javax.sql.DataSource;

@Configuration
@EnableJpaRepositories(basePackages = "com.javatodev.api.repository.bank",
        entityManagerFactoryRef = "bankEntityManagerFactory",
        transactionManagerRef= "bankTransactionManager")
public class BankDataSourceConfiguration {

    @Bean
    @ConfigurationProperties("spring.datasource.bank")
    public DataSourceProperties cardDataSourceProperties() {
        return new DataSourceProperties();
    }

    @Bean
  @ConfigurationProperties("spring.datasource.bank.configuration")
    public DataSource cardDataSource() {
        return cardDataSourceProperties().initializeDataSourceBuilder()
                .type(HikariDataSource.class).build();
    }

    @Bean(name = "bankEntityManagerFactory")
    public LocalContainerEntityManagerFactoryBean bankEntityManagerFactory(
            EntityManagerFactoryBuilder builder) {
        return builder
                .dataSource(cardDataSource())
                .packages("com.javatodev.api.model.bank")
                .build();
    }

    @Bean
    public PlatformTransactionManager bankTransactionManager(
            final @Qualifier("bankEntityManagerFactory") LocalContainerEntityManagerFactoryBean bankEntityManagerFactory) {
        return new JpaTransactionManager(bankEntityManagerFactory.getObject());
    }

}
Then create another class named as UserDataSourceConfiguration.java and setup user specific datasources as below.
package com.javatodev.api.configuration;

import com.javatodev.api.model.user.UserEntity;
import com.zaxxer.hikari.HikariDataSource;
import org.springframework.beans.factory.annotation.Qualifier;
import org.springframework.boot.autoconfigure.jdbc.DataSourceProperties;
import org.springframework.boot.context.properties.ConfigurationProperties;
import org.springframework.boot.orm.jpa.EntityManagerFactoryBuilder;
import org.springframework.context.annotation.Bean;
import org.springframework.context.annotation.Configuration;
import org.springframework.context.annotation.Primary;
import org.springframework.data.jpa.repository.config.EnableJpaRepositories;
import org.springframework.orm.jpa.JpaTransactionManager;
import org.springframework.orm.jpa.LocalContainerEntityManagerFactoryBean;
import org.springframework.transaction.PlatformTransactionManager;
import org.springframework.transaction.annotation.EnableTransactionManagement;

import javax.sql.DataSource;

@Configuration
@EnableTransactionManagement
@EnableJpaRepositories(basePackages = "com.javatodev.api.repository.user",
        entityManagerFactoryRef = "userEntityManagerFactory",
        transactionManagerRef= "userTransactionManager")
public class UserDataSourceConfiguration {
    @Bean
    @Primary
    @ConfigurationProperties("spring.datasource.user")
    public DataSourceProperties userDatasourceProperties() {
        return new DataSourceProperties();
    }

    @Bean
    @Primary
    @ConfigurationProperties("spring.datasource.user.configuration")
    public DataSource userDataSource() {
        return userDatasourceProperties().initializeDataSourceBuilder()
                .type(HikariDataSource.class).build();
    }

    @Primary
    @Bean(name = "userEntityManagerFactory")
    public LocalContainerEntityManagerFactoryBean userEntityManagerFactory(EntityManagerFactoryBuilder builder) {
        return builder
                .dataSource(userDataSource())
                .packages(UserEntity.class)
                .build();
    }

    @Primary
    @Bean
    public PlatformTransactionManager userTransactionManager(
            final @Qualifier("userEntityManagerFactory") LocalContainerEntityManagerFactoryBean userEntityManagerFactory) {
        return new JpaTransactionManager(userEntityManagerFactory.getObject());
    }
}
All done now our application could use multiple datasources in order to access multiple databases using spring data JPA, and let’s test that with simple Junit test.
package com.javatodev.api;

import com.javatodev.api.model.bank.account.AccountEntity;
import com.javatodev.api.model.bank.card.CreditCardEntity;
import com.javatodev.api.model.user.UserEntity;
import com.javatodev.api.repository.bank.AccountRepository;
import com.javatodev.api.repository.bank.CreditCardRepository;
import com.javatodev.api.repository.user.UserRepository;
import org.junit.jupiter.api.BeforeAll;
import org.junit.jupiter.api.Test;
import org.springframework.beans.factory.annotation.Autowired;
import org.springframework.boot.test.context.SpringBootTest;

import java.util.Optional;

@SpringBootTest
class SpringBootMultipleDatasourcesApplicationTests {

    @Autowired
    private UserRepository userRepository;
    @Autowired
    private CreditCardRepository creditCardRepository;
    @Autowired
    private AccountRepository accountRepository;

    private static UserEntity user;
    private static CreditCardEntity creditCard;
    private static AccountEntity account;

    @BeforeAll
    public static void initializeDataObjects(){
        creditCard = CreditCardEntity.builder().type("VISA").number("4910 0000 0000 0006").build();
        user = UserEntity.builder().username("JavaToDev").build();
        account = AccountEntity.builder().number("8884 0000 0002").build();
    }

    @Test
    public void shouldSaveUserToMemberDB() {
        UserEntity save = userRepository.save(user);
        Optional<UserEntity> userById = userRepository.findById(save.getId());
        assert (userById.isPresent());
    }

    @Test
    public void shouldSaveCreditCardToCardDB () {
        CreditCardEntity save = creditCardRepository.save(creditCard);
        Optional<CreditCardEntity> creditCardEntity = creditCardRepository.findById(save.getId());
        assert creditCardEntity.isPresent();
    }

    @Test
    public void shouldSaveBankAccountToDB () {
        AccountEntity save = accountRepository.save(account);
        Optional<AccountEntity> byId = accountRepository.findById(save.getId());
        assert (byId.isPresent());
    }


}
test output
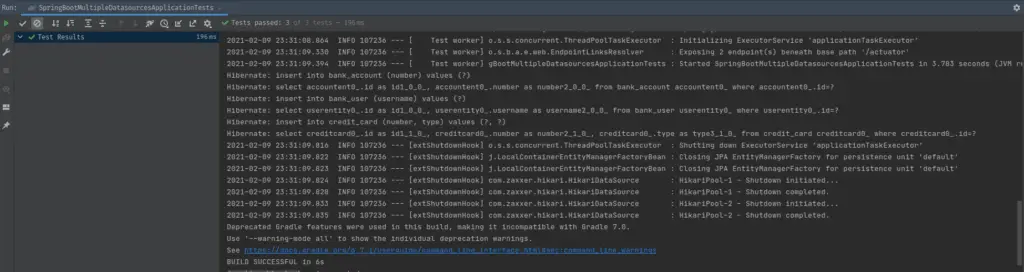
Sample test output for this project
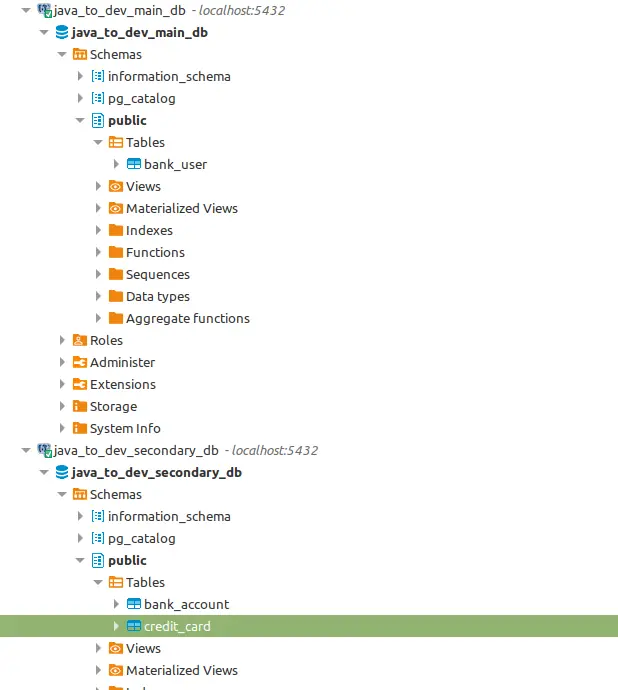
multiple databases have created for this spring boot application
Conclusion
Thanks for reading our latest article on How To Configure Multiple Datasources With Spring Boot Data JPA with practical usage.
If you are looking for spring boot based practical application development tutorials, just check our article series and comment on whatever new things you need to see on our website.
You can get source code for this tutorial from our GitHub repository.