Spring Boot REST API Using Spring Data MongoDB Tutorial
-
 Chinthaka Dinadasa
 - 27 Oct, 2020
In this article, I’m going to explain how to use the MongoDB database with a Spring Boot application using a practical scenario. Additionally, I’m going to develop a REST API covering CRUD operations to show the practical usage of using MongoDB inside a spring boot application.
Technologies going to use,
- Java 1.8
- Spring Boot 2.3.4 RELEASE
- Spring Data MongoDB
- Lombok
- Gradle
- IntelliJ Idea for IDE
Main topics I’m going to discuss here,
- Adding Required Dependencies
- Defining API Endpoints
- Basic Architecture Inside The Project
- Developing the API
- Testing API
- Conclusion
Adding Required Dependencies
For this tutorial, I’ll use spring initializr to generate a spring boot project with all the dependencies I need for this tutorial. If you are really new to Spring Boot, Please follow our article on How to Create a Spring Boot Project.
Here I’ve selected following dependencies to create spring boot project using spring initilizr,
- Spring Web – contains common web-specific utilities for both Servlet and Portlet environments.
- Spring Data MongoDB – This allows us to create integration with MongoDB and Spring Boot.
- Lombok – The coolest plugin to spicing up your java. Never write another getter or equals method again, with one annotation your class has a fully-featured builder, Automate your logging variables, and much more.
If you need to learn how we can use Lombok in spring boot follow our article Guide to use Lombok In Spring Boot.
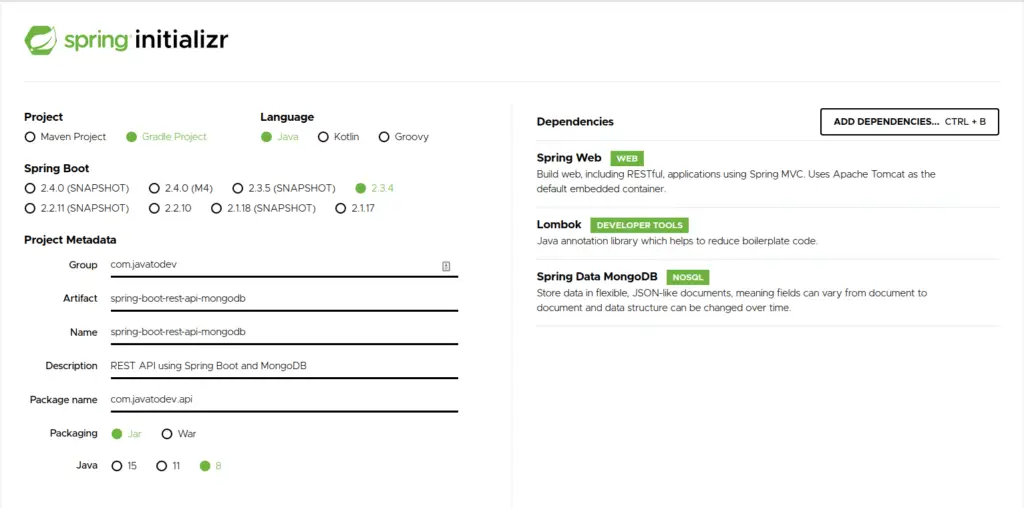
Create project with Spring Initializr
If you are using Gradle based project add following dependencies into your build.gradle file in order to add required dependencies.
implementation 'org.springframework.boot:spring-boot-starter-data-mongodb'
implementation 'org.springframework.boot:spring-boot-starter-web'
compileOnly 'org.projectlombok:lombok'
annotationProcessor 'org.projectlombok:lombok'
or else if you’re using maven based project following dependencies should be added to your project,
<dependency>
      <groupId>org.springframework.boot</groupId>
      <artifactId>spring-boot-starter-data-mongodb</artifactId>
    </dependency>
    <dependency>
      <groupId>org.springframework.boot</groupId>
      <artifactId>spring-boot-starter-web</artifactId>
    </dependency>
    <dependency>
      <groupId>org.projectlombok</groupId>
      <artifactId>lombok</artifactId>
      <optional>true</optional>
    </dependency>
All done, Now we are ready with our base spring boot project including all the necessary dependencies.
Base project structure will be like,

Base Spring Boot Project Structure for this project
Defining API Endpoints
Here I’m going to develop a simple API for Library with endpoints covering CRUD operations.
In this scenario, there are authors registered in the system. additionally, the author could have multiple books and members should be registered to lend any book from the library.
This same API has developed using MySQL and DynamoDB databases as well. You can find those tutorials from,
- Spring Boot REST API Using JPA, Hibernate, MySQL Tutorial.
- Spring Boot REST API CRUD With DynamoDB Tutorial
Our main API endpoints for this tutorial will be,
| Endpoint | HTTP Method | Description |
|---|---|---|
| /api/library/book | GET | Read all books from database. |
| /api/library/book?isbn=1919 | GET | Read book by ISBN |
| ****/api/library/book/:id | GET | Read book by ID |
| ****/api/library/book | POST | Register New Book |
| ****/api/library/book/:id | DELETE | Remove a book |
| ****/api/library/book/lend | POST | Lend a book to a member |
| ****/api/library/member | POST | Register member |
| ****/api/library/member/:id | PATCH | Update a member |
Main API Endpoints for Library API
Basic Architecture Inside The Project
In this tutorial I’m going to use 3 main layers with the architecture, Those are controller, service and repository layers.
- Controller Layer – This is the place API consumers communicating with, and we define REST path Request Body Responses here. We should only use the controller layer to capture the consumer’s request and pass it to the service layer, then return the service’s response to the consumer.
- Service Layer – We define the business logic with processing data in this layer.
- Repository Layer – We define data reads and writes using a repository layer.

Basic architecture for Spring Boot app with MongoDB
Developing the API
Now we have a fresh spring boot application with necessary dependencies to access mongodb. So first let’s start with adding configurations to access the mongodb database.
Configure MongoDB Connection For Spring Boot
There are two methods we can use to create MongoDB connection properties inside the spring boot application.
Configure with Mongo Server
Here I will explain how to use locally deployed mongoDB server.
defining host, port and other values separately,
spring.data.mongodb.host=127.0.0.1
spring.data.mongodb.port=27017
spring.data.mongodb.database=java-to-dev-api
or else, we can use ‘spring.data.mongodb.uri’ and define all properties in a single line as below,
spring.data.mongodb.uri=mongodb://127.0.0.1:27017/java-to-dev-api?ssl=false
In this tutorial I’m using mongo server without authentication, If you have a server which needs to add username and password credentials use following with your properties or change your mongodb URI accordingly.
spring.data.mongodb.username=userspring.data.mongodb.password=password
spring.data.mongodb.uri=mongodb://user:password@127.0.0.1:27017/java-to-dev-api?ssl=false
Configure Spring Boot Project with MongoDB Atlas
MongoDB Atlas offer you easily configured cloud based MongoDB on anywhere between AWS, Google cloud or Azure. Additionally you can start using MongoDB atlas for free upto 512MB storage.
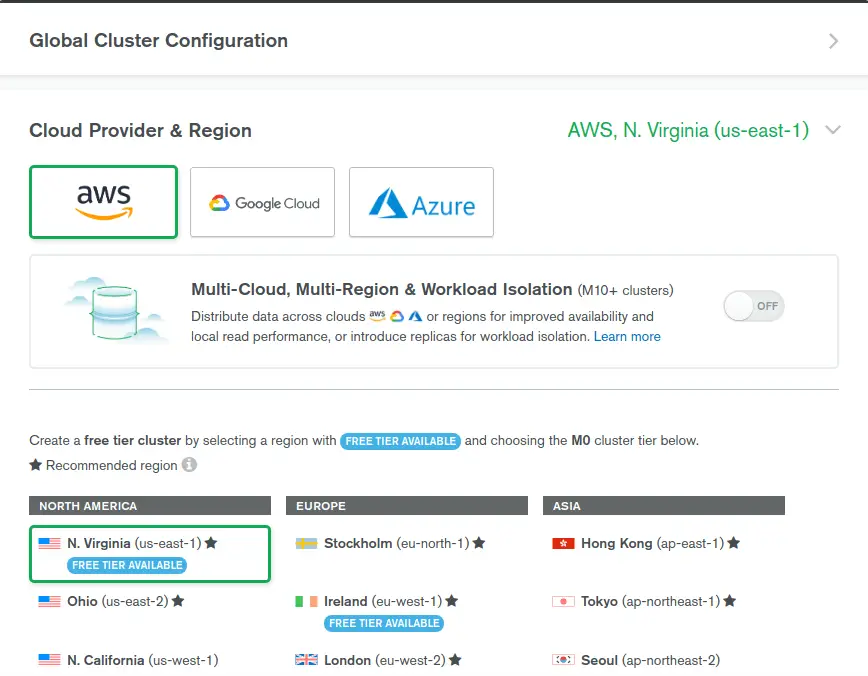
Creating a cluster in MongoDB Atlas
Here I’ll explain how you can create a database on MongoDB atlas and connect using the spring boot application.
First login to the MongoDB atlas and create your own mongo cluster. Then navigate to the collections tab inside the cluster.
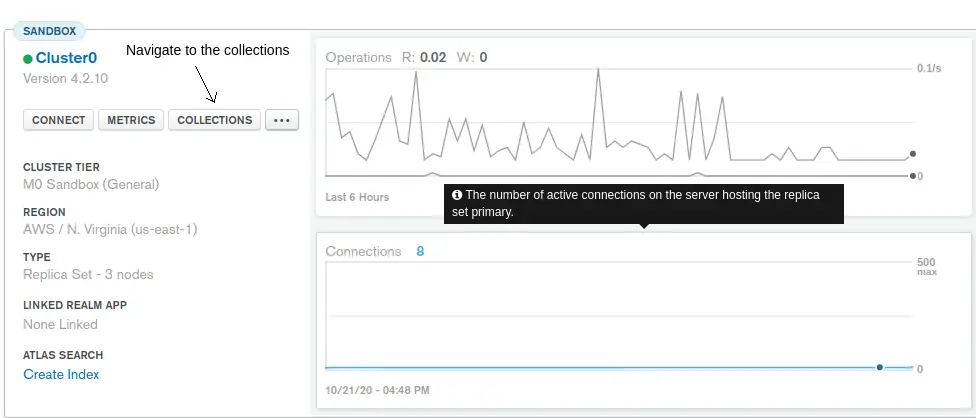
Cluster window in mongodb cloud atlas
Then you can create your own database inside the cluster in order to use with your spring boot project.
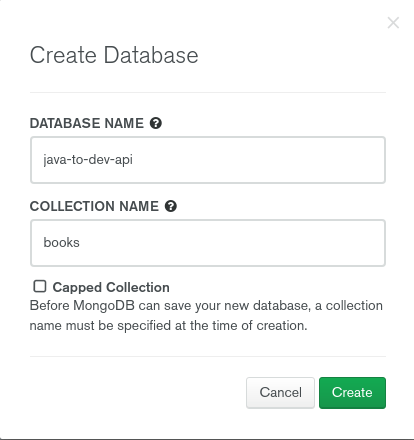
Create a database inside mongodb atlas cluster
In mongodb atlas we should always give a collection name while creating a database.
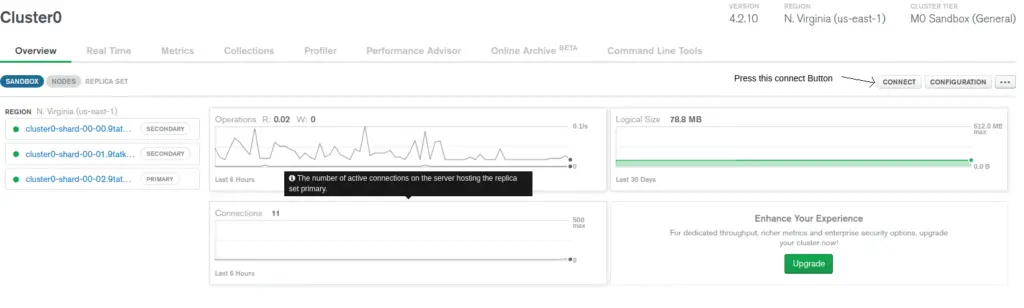
Now we have properly created cloud mongoDB database. let’s connect this database with our Spring Boot application.
Here we can copy correct mongodb.uri from mongodb atlas cloud dashboard. Follow below steps in order to capture correct connection URI.
Connect to the database
Select Connect to your application from following prompt,
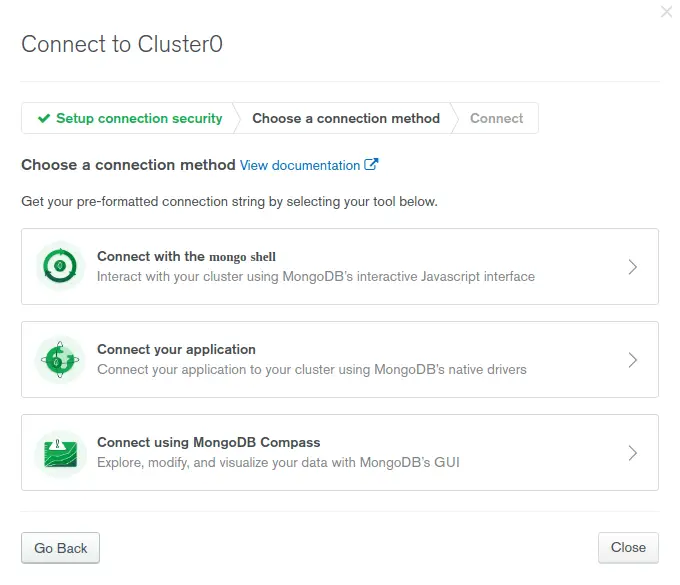
Choosing connection method.
Then select java driver version from next window and copy the connection string. Additionally this string include database username and password. change both values with correct username and password.
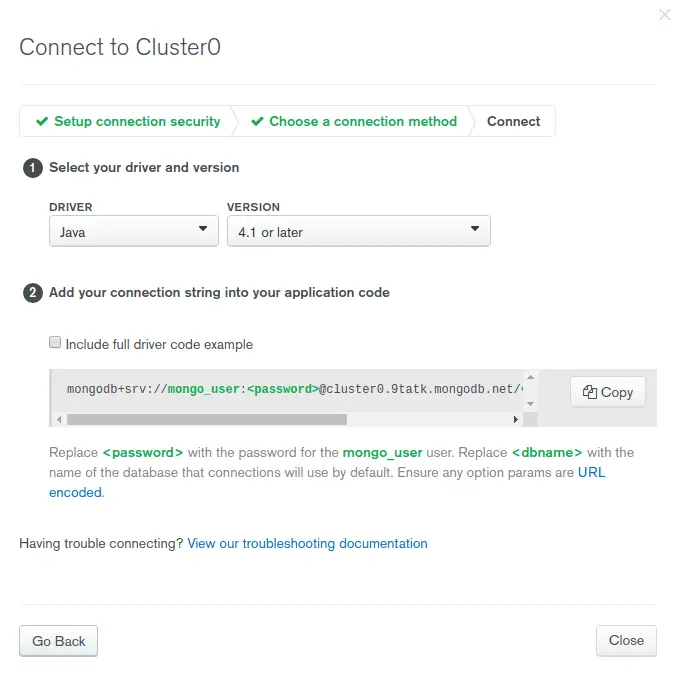
Create connection string using mongodb atlas cloud
Then add the copied connection string to ‘spring.data.mongodb.uri’ in your spring boot application.
spring.data.mongodb.uri=mongodb+srv://mongo_user:password@cluster0.mongodb.net/java-to-dev-api?retryWrites=true&w=majority
Defining Model Classes as Documents
In Spring Boot we need to use @Document annotation from mongodb library to identify a java model class as a collection for mongodb. Here collection is something like table in SQL. So here Document represents Entity in JPA.
Additionally we can define custom collection name while defining the document as follows,
@Document(collection = "author_collection")
But for this tutorial, I’ll not use custom collection names and spring boot mongo library will create collections depending on the document class name we define.
The author model will represent the author-related data set on the database. Here we only add simple parameters like firstName, lastName, and auto-generated String id for the author model.
package com.javatodev.api.model;

import org.springframework.data.annotation.Id;
import org.springframework.data.mongodb.core.mapping.Document;

import lombok.Getter;
import lombok.Setter;

@Getter
@Setter
@Document
public class Author {
    @Id
    private String id;
    private String firstName;
    private String lastName;
}
The book model will have book name, author, and isbn as default parameters, Here I’m using @DbRef from MongoDB to build the relationship with book and author. After we use this @DBRef MongoDB will share Author reference with a book without creating a whole Author inside the Book hierarchy. This is the same thing as keeping parent table ID in child table in relational databases.
package com.javatodev.api.model;

import org.springframework.data.annotation.Id;
import org.springframework.data.mongodb.core.mapping.DBRef;
import org.springframework.data.mongodb.core.mapping.Document;

import lombok.Getter;
import lombok.Setter;

@Getter
@Setter
@Document
public class Book {

    @Id
    private String id;
    private String name;
    private String isbn;
    @DBRef
    private Author author;

}
Now we can store and manage any kind of book with it’s author data in mongoDB, Now we need to add library members in order to lend the books.
Here I’m using name and member status as parameters for library member. MemberStatus will be added using an enum.
package com.javatodev.api.model;

public enum MemberStatus {
    ACTIVE, DEACTIVATED
}
package com.javatodev.api.model;

import org.springframework.data.annotation.Id;
import org.springframework.data.mongodb.core.mapping.Document;

import lombok.Builder;
import lombok.Getter;
import lombok.Setter;

@Getter
@Setter
@Document
public class Member {

    @Id
    private String id;
    private String firstName;
    private String lastName;
    private MemberStatus status;

}
Now we have authors, books and members ready. Let’s add Lend document to keep track on book lending inside our library.
Lend table will have status defined using an enum, lending started date, due date, book and member as parameters,
Here I’m using @DbRef to reference Book and Member for lending.
package com.javatodev.api.model;

public enum LendStatus {
    AVAILABLE, BURROWED
}
package com.javatodev.api.model;

import org.springframework.data.annotation.Id;
import org.springframework.data.mongodb.core.mapping.DBRef;
import org.springframework.data.mongodb.core.mapping.Document;

import java.time.Instant;

import lombok.Builder;
import lombok.Getter;
import lombok.NoArgsConstructor;
import lombok.Setter;

@Getter
@Setter
@Document
public class Lend {

    @Id
    private String id;
    private LendStatus status;
    private Instant startOn;
    private Instant dueOn;
    @DBRef
    private Book book;
    @DBRef
    private Member member;

}
All good. Now we have defined all the models with relationships that we need to store our dataset inside this API.
Defining Repository Layer
Now our application has model classes to map our database with java. So our database access layer is missing one more additional component. That’s repository layer. Let’s build the repository layer now.
Here I’ll use MongoRepository which allows us to build communication with the database easily. This MongoRepository is the same as JPARepository for the SQL-based database. It has multiple default implementations to support saveAll(), findById(), save() and more which coming with CrudRepository.
Here is the AuthorRepository which build the database communication part for Author table. Here We need to give Document class name and Data type for the ID value as parameters for MongoRepository.
package com.javatodev.api.repository;

import com.javatodev.api.model.Author;

import org.springframework.data.mongodb.repository.MongoRepository;

public interface AuthorRepository extends MongoRepository<Author, String> {
}
All three other Entities like Book, Lend and Member should have Repositories like above, Additionally, there are few additional read methods we should add in a few repositories to support our service layer logic.
public interface BookRepository extends MongoRepository<Book, String> {
    Optional<Book> findByIsbn(String isbn);
}
public interface LendRepository extends MongoRepository<Lend, String> {
    Optional<Lend> findByBookAndStatus(Book book, LendStatus status);
}
Now we have a full database access layer with mappings and repository layer. Let’s focus on the writing service layer.
Here we can use a repository layer directly from a controller. But as a standard keep in mind to access data with a service layer and process it there and return using a controller.
Adding Service Layer
We only have simple requirements around a simple library system, Hence full business logic could wrap around a single service, Let’s call it LibraryService.java. If you have any idea of having multiple services it’s up to you and free to use as you need.
Additionally I’m using few request classes to bring data from controller layer to service layer like below,
AuthorCreationRequest.java
package com.javatodev.api.model.request;

import lombok.Data;

@Data
public class AuthorCreationRequest {
    private String firstName;
    private String lastName;
}
BookCreationRequest.java
package com.javatodev.api.model.request;

import lombok.Data;

@Data
public class BookCreationRequest {
    private String name;
    private String isbn;
    private String authorId;
}
BookLendRequest.java
package com.javatodev.api.model.request;

import java.util.List;

import lombok.Data;

@Data
public class BookLendRequest {
    private List<String> bookIds;
    private String memberId;
}
MemberCreationRequest.java
package com.javatodev.api.model.request;

import lombok.Data;

@Data
public class MemberCreationRequest {
    private String firstName;
    private String lastName;
}
LibraryService.java
package com.javatodev.api.service;

import com.javatodev.api.exception.EntityNotFoundException;
import com.javatodev.api.model.*;
import com.javatodev.api.model.request.AuthorCreationRequest;
import com.javatodev.api.model.request.BookCreationRequest;
import com.javatodev.api.model.request.BookLendRequest;
import com.javatodev.api.model.request.MemberCreationRequest;
import com.javatodev.api.repository.AuthorRepository;
import com.javatodev.api.repository.BookRepository;
import com.javatodev.api.repository.LendRepository;
import com.javatodev.api.repository.MemberRepository;

import org.springframework.beans.BeanUtils;
import org.springframework.stereotype.Service;

import java.time.Instant;
import java.time.temporal.ChronoUnit;
import java.util.ArrayList;
import java.util.List;
import java.util.Optional;

import lombok.RequiredArgsConstructor;

@Service
@RequiredArgsConstructor
public class LibraryService {

    private final AuthorRepository authorRepository;
    private final MemberRepository memberRepository;
    private final LendRepository lendRepository;
    private final BookRepository bookRepository;

    public Book readBookById(String id) {
        Optional<Book> book = bookRepository.findById(id);
        if (book.isPresent()) {
            return book.get();
        }
        throw new EntityNotFoundException("Cant find any book under given ID");
    }

    public List<Book> readBooks() {
        return bookRepository.findAll();
    }

    public Book readBook(String isbn) {
        Optional<Book> book = bookRepository.findByIsbn(isbn);
        if (book.isPresent()) {
            return book.get();
        }
        throw new EntityNotFoundException("Cant find any book under given ISBN");
    }

    public Book createBook(BookCreationRequest book) {
        Optional<Author> author = authorRepository.findById(book.getAuthorId());
        if (!author.isPresent()) {
            throw new EntityNotFoundException("Author Not Found");
        }
        Book bookToCreate = new Book();
        BeanUtils.copyProperties(book, bookToCreate);
        bookToCreate.setAuthor(author.get());
        return bookRepository.save(bookToCreate);
    }

    public void deleteBook(String id) {
        bookRepository.deleteById(id);
    }

    public Member createMember(MemberCreationRequest request) {
        Member member = new Member();
        BeanUtils.copyProperties(request, member);
        member.setStatus(MemberStatus.ACTIVE);
        return memberRepository.save(member);
    }

    public Member updateMember (String id, MemberCreationRequest request) {
        Optional<Member> optionalMember = memberRepository.findById(id);
        if (!optionalMember.isPresent()) {
            throw new EntityNotFoundException("Member not present in the database");
        }
        Member member = optionalMember.get();
        member.setLastName(request.getLastName());
        member.setFirstName(request.getFirstName());
        return memberRepository.save(member);
    }

    public Author createAuthor (AuthorCreationRequest request) {
        Author author = new Author();
        BeanUtils.copyProperties(request, author);
        return authorRepository.save(author);
    }

    public List<String> lendABook (BookLendRequest request) {

        Optional<Member> memberForId = memberRepository.findById(request.getMemberId());
        if (!memberForId.isPresent()) {
            throw new EntityNotFoundException("Member not present in the database");
        }

        Member member = memberForId.get();
        if (member.getStatus() != MemberStatus.ACTIVE) {
            throw new RuntimeException("User is not active to proceed a lending.");
        }

        List<String> booksApprovedToBurrow = new ArrayList<>();

        request.getBookIds().forEach(bookId -> {

            Optional<Book> bookForId = bookRepository.findById(bookId);
            if (!bookForId.isPresent()) {
                throw new EntityNotFoundException("Cant find any book under given ID");
            }

            Optional<Lend> burrowedBook = lendRepository.findByBookAndStatus(bookForId.get(), LendStatus.BURROWED);
            if (!burrowedBook.isPresent()) {
                booksApprovedToBurrow.add(bookForId.get().getName());
                Lend lend = new Lend();
                lend.setMember(memberForId.get());
                lend.setBook(bookForId.get());
                lend.setStatus(LendStatus.BURROWED);
                lend.setStartOn(Instant.now());
                lend.setDueOn(Instant.now().plus(30, ChronoUnit.DAYS));
                lendRepository.save(lend);
            }

        });
        return booksApprovedToBurrow;
    }
}
Additionally, I’ve created a custom exception to throw if there is no data found for given instructions from the database. If you need to check how we can implement custom exceptions and handle the inside spring boot, check out our article on Exception Handling Spring Boot REST API
package com.javatodev.api.exception;

public class EntityNotFoundException extends RuntimeException {
    public EntityNotFoundException(String message) {
        super(message);
    }
}
Method definitions are as follows.
- readBookById(String id) – This method will read Book using given String ID. and Here I’ve used java.util.Optional to easily check availability after reading any data. This will return a Runtime exception if there is no data present for the given ID.
- readBooks() – Read all books stored in the database.
- createBook(BookCreationRequest book) – This method will bring data from the controller using BookCreationRequest and store those data in the database and return created book after successfully completed.
- deleteBook(String id) – Deletes a book by a given ID.
- createMember(MemberCreationRequest request) – This creates a member using membercreationrequest.
- updateMember (String id, MemberCreationRequest request) – Update the first name and last name of a member under a given ID.
- createAuthor (AuthorCreationRequest request) – Create an author using given author properties.
- lendABook (BookLendRequest request) – Create book lending on after reading book and member. Additionally, this allows lending multiple books for a single member. Additionally this stores
Now we are ready with our business logic with seperate service layer. Let’s add the Rest Controllers to expose these methods as a REST API.
Controller Layer to Expose REST API Endpoints
Here we need to have multiple endpoints to support different aspects. Additionally ‘/api/library‘ is common for every endpoint which defined in this API contract.
Let’s start with adding a controller with @RequestMapping to ‘/api/library’,
package com.javatodev.api.controller;

import com.javatodev.api.service.LibraryService;

import org.springframework.web.bind.annotation.RequestMapping;
import org.springframework.web.bind.annotation.RestController;

import lombok.RequiredArgsConstructor;

@RestController
@RequestMapping(value = "/api/library")
@RequiredArgsConstructor
public class LibraryController {
    private final LibraryService libraryService;
}
So every and each endpoint we define inside this rest controller will have ‘/api/library’ as the prefix for the API URL and I’ll use @RequiredArgsConstructor from lombok to inject LibraryService into this controller.
Here as a standard we are not calling any repository directly from controller, every and each request is going through a service and coming back through the service too.
GET mapping for book findAll and find using ISBN will cover this endpoint. Here I’m using @RequestParam and it should be passed through the URL, and It’s an optional value. we can use @RequestParam to get optional parameters like this in Spring Boot REST API. Additionally, I’m using ResponseEntity without passing a type, hence I could return both List
@GetMapping("/book")
public ResponseEntity readBooks(@RequestParam(required = false) String isbn) {
        if (isbn == null) {
            return ResponseEntity.ok(libraryService.readBooks());
        }
        return ResponseEntity.ok(libraryService.readBook(isbn));
    }
GET mapping to read a book by ID. The ID is passing as a path variable, hence the URL will add the ID in the end, be careful to add the same name in both URL and the variable you are going to use a path variable here.
@GetMapping("/book/{bookId}")
    public ResponseEntity<Book> readBook (@PathVariable String bookId) {
        return ResponseEntity.ok(libraryService.readBookById(bookId));
    }
POST mapping for creating a book. In this endpoint the API accepts a request body, so always it’s defined as an application/json by default in spring boot.
@PostMapping("/book")
    public ResponseEntity<Book> createBook (@RequestBody BookCreationRequest request) {
        return ResponseEntity.ok(libraryService.createBook(request));
    }
DELETE API for delete book by ID. Here same as read by ID we can pass an identification to identify correct value from DB to DELETE.
@DeleteMapping("/book/{bookId}")
    public ResponseEntity<Void> deleteBook (@PathVariable String bookId) {
        libraryService.deleteBook(bookId);
        return ResponseEntity.ok().build();
    }
POST API for create a member
@PostMapping("/member")
    public ResponseEntity<Member> createMember (@RequestBody MemberCreationRequest request) {
        return ResponseEntity.ok(libraryService.createMember(request));
    }
PATCH mapping for update created member. Here we need to have both member id and update request, So we can pass the ID through URL and the updates through the body.
@PatchMapping("/member/{memberId}")
    public ResponseEntity<Member> updateMember (@RequestBody MemberCreationRequest request, @PathVariable String memberId) {
        return ResponseEntity.ok(libraryService.updateMember(memberId, request));
    }
POST API to do a lending for a book.
@PostMapping("/book/lend")
    public ResponseEntity<List<String>> lendABook(@RequestBody BookLendRequest bookLendRequests) {
        return ResponseEntity.ok(libraryService.lendABook(bookLendRequests));
    }
POST API to create author.
@PostMapping("/author")
    public ResponseEntity<Author> createAuthor (@RequestBody AuthorCreationRequest request) {
        return ResponseEntity.ok(libraryService.createAuthor(request));
    }
Final project structure,
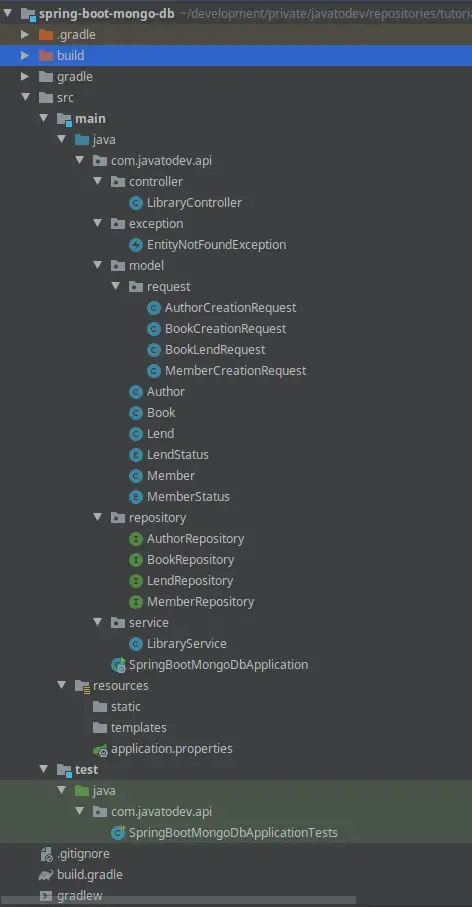
Final Project Structure Spring Boot MongoDB Project
Now we are ready with API. Let’s go forward with testing the API.
Testing API
Here I’m using Postman to test our API built using MongoDB and Spring Boot. Additionally, You can access the following postman collection by just pressing the following button on your browser. Use JAVA_TO_DEV -> MONGO_DB Collection to test this API.
Create an author,
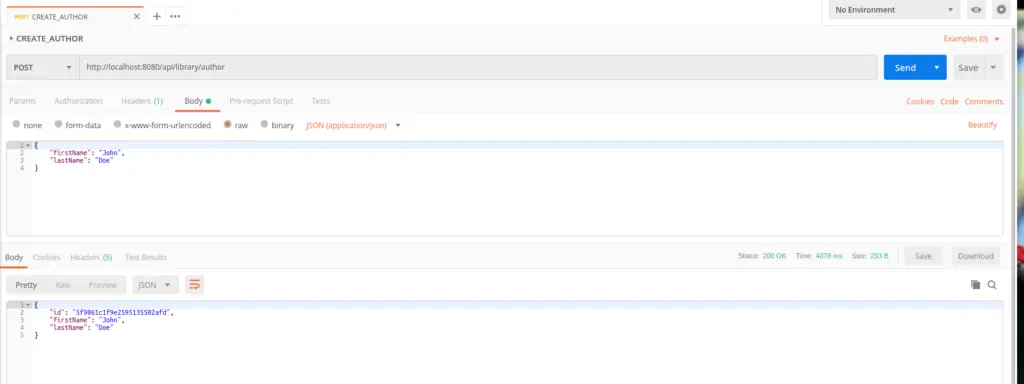
Create an author
Create a Book,
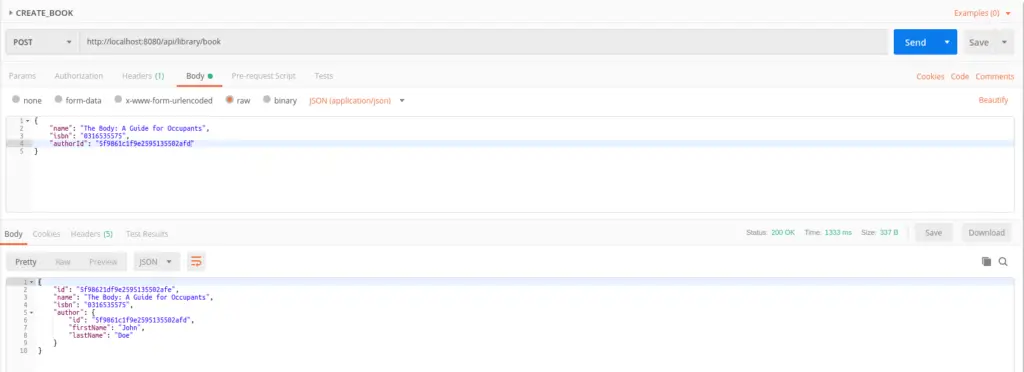
Create a book using API
Create a member,
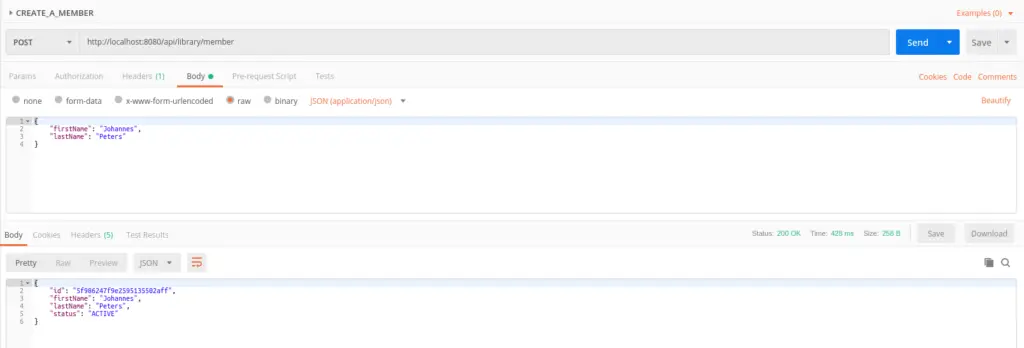
Create a member
Reading APIs.
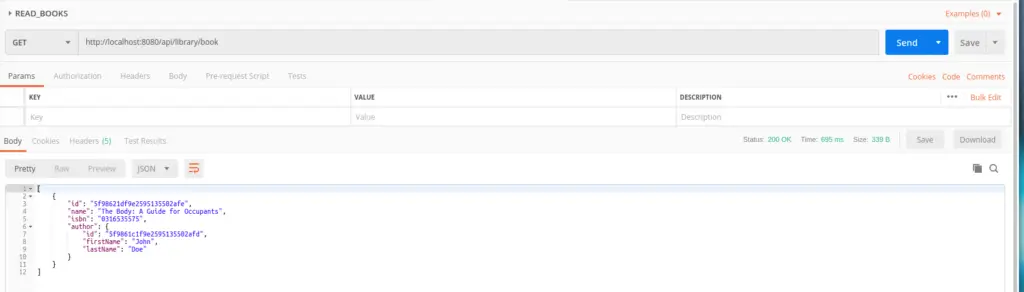
Read all books from database
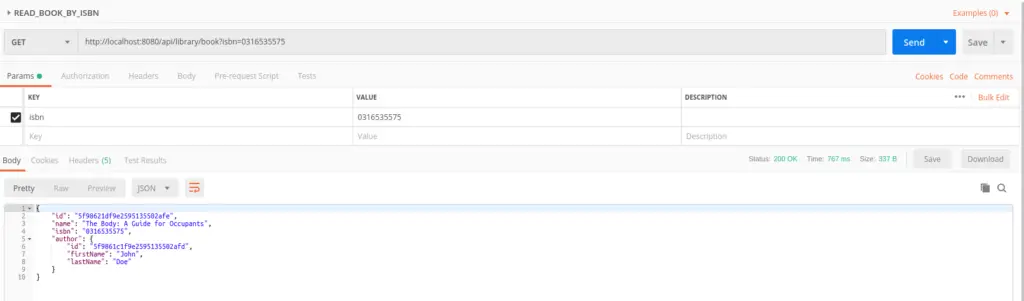
Read a Book by ISBN
Lend a book,
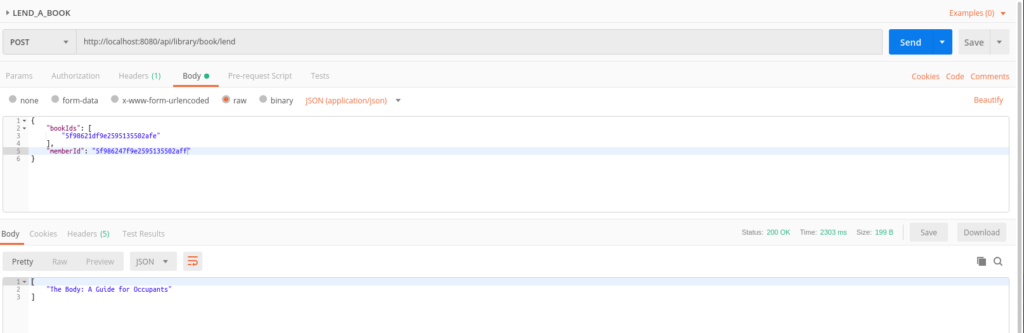
Lend a book
Conclusion
All done, Now I hope you have a good understanding of how to use MongoDB database with Spring Boot REST API development. Comment your ideas or issues you are facing while developing your Spring boot API.
You can find source codes for this tutorial from our Github.